

Tuesday, October 23, 2012
Book Cover Art
Here's a recent work I did for author, Janis Kearney. This is a portrait of her father for her most recent work which is a biography of his life. It will be included in the cover art for the book. This was a fun assignment. I especially liked working in the sepia tones. I found his hands the most interesting part. Janis had taken a photo of him at home. We both thought this pose was striking and thought provoking. The piece is in acrylic on a 16x20 canvas.

Friday, September 14, 2012
The LEGO Frame
Here's an excellent idea from Casey Cox, one of my long-time customers. Her boy enjoys spending hours constructing LEGO block creations on the floor. Now he can build on the wall as well.
I assembled this LEGO board frame from 9 building plates attached to a masonite backing and surrounded with a wood frame. This will be fastened directly to the wall with screws for a stable building platform.
The building plates are available in a variety of colors directly from LEGO. These can be combined in any combination with the frame moulding of your choice to create your own Legoland!
Sunday, August 5, 2012
New pollard Abstract
New study in red, yellow, and blue. This is 30x40 on canvas. $400. Come by and take a look. Got it in my window for the world to see. And don't forget, 10% off new art till end of August. 
Tuesday, July 10, 2012
Arkansas Soldier
Today's post is of a painting I recently completed for one of our local veterans. It was a fun subject, and I was able to combine fantasy and realism for a unique result. 
Friday, June 15, 2012
Outer Citron
Today I have a new painting to show off. This work was commissioned by a client of mine. He wanted something with this particular bottle and a martini glass and told me to have fun with it.
I produced some thumbnails for him, and he picked this design. I enjoyed creating the outer space star pattern and couldn't resist replicating the quilted pattern in the glass bottle.
Overall I believe we were both pleased with the outcome. If you have something special in mind you would like to have created on canvas, stop by or contact me and we can set our imaginations in motion.
Friday, May 25, 2012
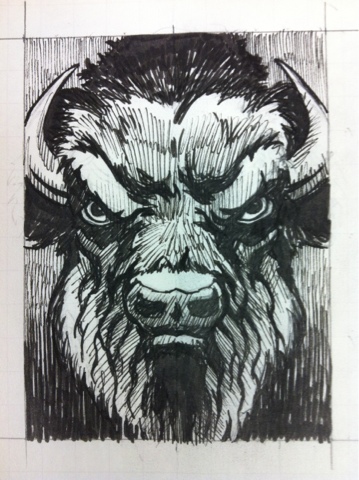
The BISON is Here!


Friday, May 4, 2012
Painting a Portrait

I recently had the honor to do a portrait of the late Schree Brogdon and baby Lily. The end result, I felt, was touching and delicate.
In the following photos you can see my step by step approach to rendering the subjects in acrylic on canvas. The finish size was 16x20 inches.
In the first photos you can see I have made a detailed pencil drawing on the canvas. This is sealed with fixative to prevent smearing. Next the background is carefully worked in around the figures, and a sienna tone is added to the figures allowing the sketch to show through.


 I enjoyed doing this portrait and hope it is loved by the family for years to come. If you would like a portrait of one of your family members, you can reach me at 501-278-5547 on week days or at www.pollardstudio.com.


Friday, April 20, 2012
The Final Result
This is the final entry in my TARDIS building project. Here the final coat of paint and distressing has been added for that ancient look.
The top lantern has been installed. It was made from a garden path light I found at Lowes. I made some slight alterations and painted the finish to match the rest of the box.
The signs were made of 3/4 inch picture frame moulding. These were filled with plexiglas. Black vinyl courtesy of www.conleygraphics.net was cut and added to the front of the plexi. I also sanded the back side of the plexi to give the letters a foggy matte look.
Finally I installed a sound effects board inside the roof area. This includes a sound to light modulator that controls the intensity of the lantern glow. I have hidden buttons to control the sounds which include the takeoff and landing "breathing" sounds that all Whovians adore.
All of the electronics are plugged into a single remote controlled power strip so everything can be engaged at once.
Thanks to everyone for joining me on my journey.
Friday, April 13, 2012
TARDIS Blue
Well you can't just go to the paint store and order TARDIS blue, but I did the best I could. Here is the first coat of beautiful paint on my phone box. Later I will add a layer of weathering to give it an older appearance. You can also see from the picture I've installed a working door lock and key. 
Friday, April 6, 2012
It's all in the Details
Another TARDIS update: Each window was completed with dividers made of quarter inch dowels. Each bar is made of two dowels joined with glue. Next the long strips were custom painted and antiqued. Then each section was carefully trimmed to fit and glued into place directly onto the plexiglas windows with construction adhesive. This might not be the most orthodox method, but I've never made a claim to orthodoxy.
I've also completed the phone access door. Unfortunately it's a faux door as the cabinet design did not allow for anything else. Nevertheless, I have included both handle and hinges for an accurate appearance. The sign was adapted from some fan art I found online. It includes some nice weather spotting. This is placed under a piece of plexi secured by four screws. The frame is 1.5 inch lattice.
The added window details seen here are custom cut pieces of pebbled dropped ceiling light covers. These were applied with spray adhesive directly to the face of the plexiglas.
Till next time.
Friday, March 30, 2012
TARDIS update
At this point in construction the roof is being fabricated. It is made of several stacked frames. On the bottom we have flat 1x4's then upturned 2x4's then upturned 1x4's. Next I built a cross frame architecture to hold up the angled roof panels and lantern box. More next time.
If this is your first look at the blog, click on January in the blog archive on the right. This will clue you in on what a TARDIS is and why I'm building one.

If this is your first look at the blog, click on January in the blog archive on the right. This will clue you in on what a TARDIS is and why I'm building one.
Wednesday, February 22, 2012
Bison Sneak Peek
Just a look at my next mascot project. This will eventually be an acrylic on canvas. 
Wednesday, February 15, 2012
Two Doors and a Time Rotor
Here I have attached the door panels. The front and rear panels were attached with piano hinges to allow them to open outward. (Note: this is not the normal way for TARDIS doors to open, but it has happened on occasion. Most notably in "The Eleventh Hour" and "Castrovalva.")
Anyway, you will also notice I've added a middle strip of 1.25 inch lattice. On the front side the lattice is attached to the left panel.
I've also installed plexiglas or Perspex as they call it across the pond in each of the window openings. I have sprayed a light coating of grey primer to the back of each piece. This still allows for plenty of light to shine through from the internal lights to be added later, while at the same time obscuring any view of the interior from meddling Daleks or Sontarans. Each piece is glued in place, and I also used some framers points to make sure the windows don't fall out somewhere in the time vortex.
Saturday, February 11, 2012
The Doors
As you can see, I had a little help from Jack Harkness at this stage. You may also notice there are six identical panels. I skipped the last two since that side will be facing the wall.
Each panel is made of 1x4 cedar boards with a solid 1/4 inch luan plywood panel. A hole was cut for each window opening. Later each panel was routed with a bevel tool to add dimension.
Each panel is made of 1x4 cedar boards with a solid 1/4 inch luan plywood panel. A hole was cut for each window opening. Later each panel was routed with a bevel tool to add dimension.
Sunday, January 29, 2012
The Fourth Dimension
Here things are starting to take shape. I placed the base into position around the shelf system and attached the four posts to the base with four large screws each. It was important to hold the posts as straight as possible during this step.
Next I added some door lintels composed of stacked 1x2's. Here too, these were installed as straight and square as possible.
Not shown here is the addition of two large sheets of plywood to opposite sides of the box. These added stability and provided a place to attach extra shelves in the back side of the TARDIS.
Thursday, January 26, 2012
The Four Corners
At this stage in the production of my very own TARDIS I assemble the four uprights. Each post is made of six separate boards: two 1x4's on the outside, two 1x3's offset from those, a core of one 2x2, and an outer corner accent piece of cove moulding. This was the simplest manner I could find to fabricate the posts and avoided table saws and routers, while still giving me an authentic presentation. Next time, the project begins to take shape!
Monday, January 23, 2012
The Foundation
The first step in building the exterior of the TARDIS was the base. It's approximately 4.5 feet wide and 4 inches tall. I used 2x4's and some angled door facing to give it a slope. I cut each piece on the miter saw and joined with 2" brads. The facing was mounted directly to the 2x4's.


Friday, January 20, 2012
Back to the Drawing Board
Building a TARDIS is not something you just jump into without a plan. So, the first thing I did was research. My greatest help came from an online community of like minded Whovians over at tardisbuilders.com. I collected all the photo reference and real dimensions I could in order to produce the blueprints you see here. This is not to say that I didn't vary a bit from the plans during the project, but this was my dominant guide.
In order to fit the beast in my living room and encase the sliding bookshelf system, my box is about 85-90% of the size of the actual TV prop. The 80's prop was about the size of mine, just over 8 feet tall. Matt Smith explores the universe in a stylish 10 foot tall model these days.
Luckily this size worked out well for using stock lumber without having to rip it down to size. Additionally, I avoided using a table saw (which I don't own and am a little leery of) for the whole project except for a couple of pieces I had sized at the hardware store prior to bringing them home.
Next post I'll show you the first piece I assembled.

Thursday, January 12, 2012
The Doctor and the Rummage Sale
It all started with an old entertainment center that a friend of mine was selling at our spring yard sale. As I was looking at it I thought, "the TARDIS is about that size." From that point on I could think of nothing else but transforming that cabinet into a time machine.
My goal was to not only construct the most truly geek item in the county, but also make it functional. So it was to become a movie cabinet. Our old one had seen better days.
The first step was stripping the cabinet down to a shell. This was to house sliding shelves for our movie collection. In the photo you can see this early incarnation with TARDIS blue shelves.

Monday, January 9, 2012
Genesis of the TARDIS
For the next few posts I will be indulging in one of my favorite interests. Since childhood I've been fascinated with Doctor Who and become even more so since the series was rebooted on the BBC in 2005. For those who don't know, the Doctor is a 900+ year old Time Lord from the planet Gallifrey who travels through time and space in a ship called the TARDIS. (Time And Relative Dimension In Space) The ship has a cloaking device which allows it to take the form of a common object in the environment in which it materializes. But do to some internal quirk it has been stuck in the form of a British Police Box. Check back soon to see what I've been up to.

Subscribe to:
Posts (Atom)